
How to Identify and Remove Bloatware from Your Windows 11
Bloatware refers to unwanted pre-installed software with new PCs or operating system installations. While some of these applications might seem harmless, they can clutter your system, consume valuable resources, and impact overall performance. Identifying and removing bloatware on Windows 11 can enhance your computer’s efficiency and give you more control over your system.
Fortect guide will walk you through the steps to effectively identify and remove bloatware from your Windows 11 PC.
What is Bloatware?

Bloatware consists of unnecessary or redundant software that manufacturers pre-install on new devices. These programs often include trial software versions, toolbars, or other applications you may never use. They can slow down your system by consuming storage space and processing power and may even pose security risks.
Types of Bloatware
- Trial Software: Programs with a limited trial period often require a purchase to continue using.
- Toolbars: Browser add-ons or extensions that clutter your browser and may slow down performance.
- Pre-installed Apps: Applications bundled with the operating system you may not use, such as games or productivity tools.
- Manufacturer-Specific Software: Utilities and tools provided by the PC manufacturer that might duplicate functionality available in Windows or other software.
- Adware: Software designed to display advertisements and can be intrusive or disruptive.
3 Ways To Remove Bloatware
1. Uninstall Unwanted Programs
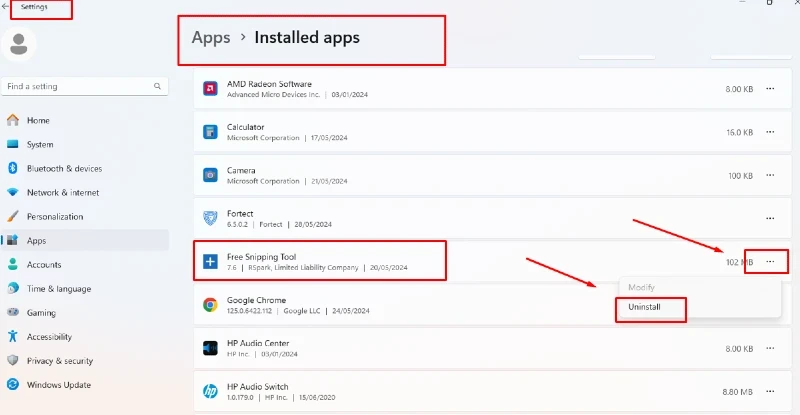
To remove bloatware, follow these steps:
- Open Settings by pressing Win + I.
- Navigate to Apps and select Apps & features.
- Find the application you wish to remove, click on the three dots next to it, and select Uninstall.
- Follow the prompts to complete the uninstallation.
2. Use PowerShell for Advanced Removal
For stubborn bloatware that doesn’t uninstall through the standard method, you can use PowerShell:
- Right-click the Start button and select Windows Terminal (Admin) or PowerShell (Admin).
- Enter the command Get-AppxPackage to list all installed apps.
- Identify the package names of the bloatware you wish to remove.
- Use the command Remove-AppxPackage <PackageFullName> to uninstall specific applications.
3. Use a Third-Party Solution
Invest in a third-party PC optimization tool such as Fortect to help remove bloatware and junk files.
Fortect automatically scans your PC for junk files and bloatware, causing PC slow performance and providing real-time notifications. It helps free up storage space and boosts system performance.
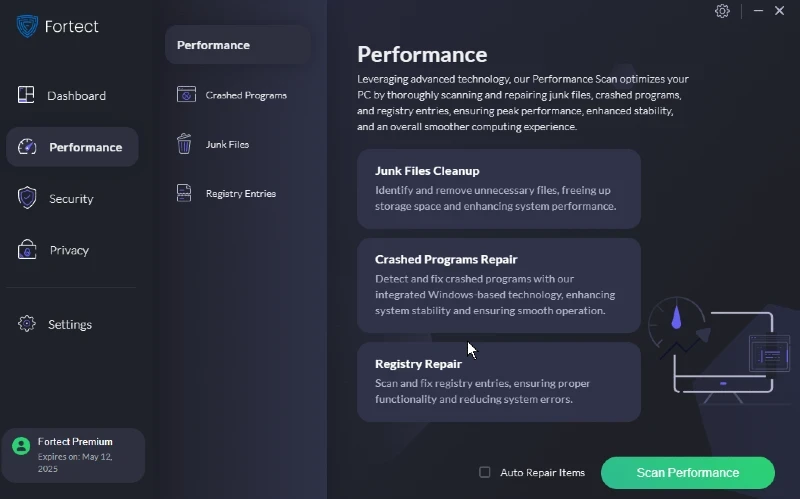
Fortect provides advanced features for cleaning up your system, including detecting and removing unwanted software and residual files and improving overall performance.
Download and install Fortect now.
Signs of Bloatware
- Pre-installed Software: Programs that you don’t recall installing or that you don’t use.
- Performance Issues: Slower system performance or increased startup times.
- Frequent Notifications: Unwanted notifications from applications you don’t use.
Conclusion
Removing bloatware from your Windows 11 PC is crucial for optimizing your system’s performance and reclaiming valuable resources. By identifying unwanted software through the Settings menu, Task Manager, and PowerShell, you can streamline your system and improve efficiency.
Regular maintenance and careful management of installed programs, including third-party solutions, will help keep your Windows 11 PC running smoothly and free from clutter.


