
How to Fix Broken Registry Items on Windows
Encountering issues with broken registry items on your Windows PC can be frustrating, leading to performance drops and unexpected errors. Understanding what causes these problems and how to fix them can keep your system running smoothly.
Fortect’s guide covers the essentials of the Windows Registry, common causes of broken registry items, and detailed steps to fix them.
What is Windows Registry?

The Windows Registry is a critical database that stores configuration settings and options for the operating system and installed applications. It acts as the brain of your computer, keeping track of system hardware, software, user preferences, and other essential data necessary for the smooth operation of your PC.
Common Causes of Broken Registry
There are multiple reasons why your Windows Registry might be broken, but the causes below are the most common ones.
- Software Installation/Uninstallation: Incomplete or faulty installations and uninstallations can leave behind invalid registry entries, causing errors.
- Malware and Viruses: Malicious software can alter or corrupt registry entries, leading to system instability and security vulnerabilities.
- System Shutdowns: Improper shutdowns or sudden power losses can result in incomplete registry updates, causing corruption.
9 Fixes: Broken Registry Items
Follow these nine practical solutions to address broken registry items on your Windows PC, ensuring smoother performance and system stability.
Method 1. Use the Disk Cleanup Tool
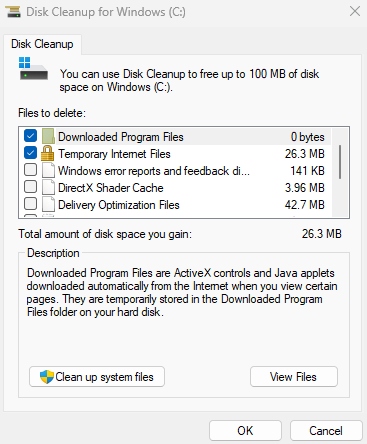
- Open the Start menu and type “Disk Cleanup.”
- Select the Disk Cleanup app from the search results.
- Choose the drive you want to clean up (usually the C: drive) and click “OK.”
- Check the boxes for the types of files you want to delete, such as Temporary and System files.
- Click “OK” and “Delete Files” to start the cleanup process.
Method 2. Try the Automatic Repair Tool
- Open the Start menu and click on “Settings.”
- Go to “Update & Security” and then “Recovery.”
- Under Advanced Startup, click “Restart now.”
- Select “Troubleshoot” from the options.
- Click on “Advanced options” and then “Startup Repair.”
- Follow the on-screen instructions to complete the repair process.
Method 3. Run an SFC Scan
Windows’s System File Checker (SFC) tool identifies and repairs broken system files by scanning your computer for damage and restoring them to proper functionality.
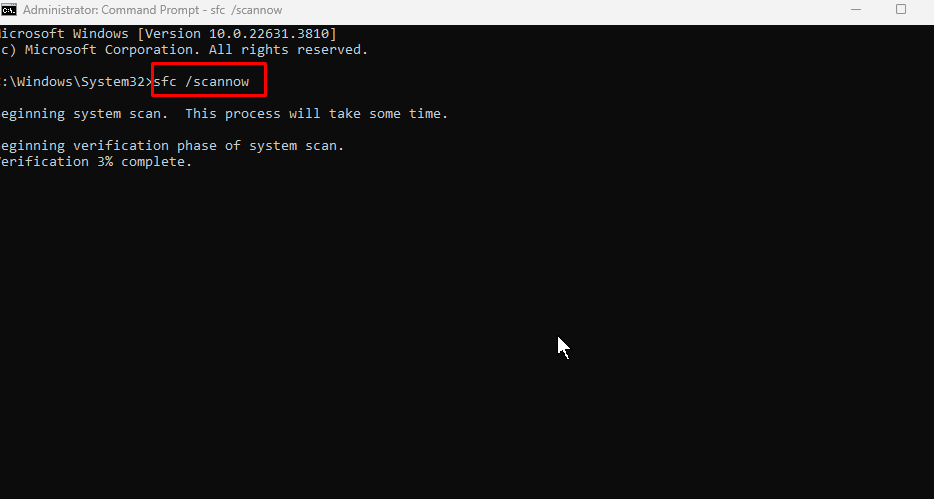
- Press Win + X and select “Command Prompt (Admin)” or “Windows PowerShell (Admin).”
- Type sfc /scannow and press Enter.
- Wait for the scan to complete. It may take some time.
- If any issues are found, the tool will attempt to fix them automatically.
Method 4. DISM Scan
- Press Win + X and select “Command Prompt (Admin)” or “Windows PowerShell (Admin).”
- Type DISM /Online /Cleanup-Image /RestoreHealth and press Enter.
- Wait for the process to complete. This might take a while.
- After completion, rerun an SFC scan to ensure all issues are fixed.
Method 5. Check for Malware on Your System
Viruses and malware can alter or corrupt registry entries, leading to system instability and errors. Malware often targets the registry to gain control over system settings, making it a common cause of broken registry items. Removing malware ensures that any corrupted registry entries are identified and can be safely repaired.

I suggest investing in Fortect PC solution with extensive Malware Scanning and defense. The premium account automatically scans, detects, and repairs broken registry issues caused by malware on your Windows and optimizes your PC.
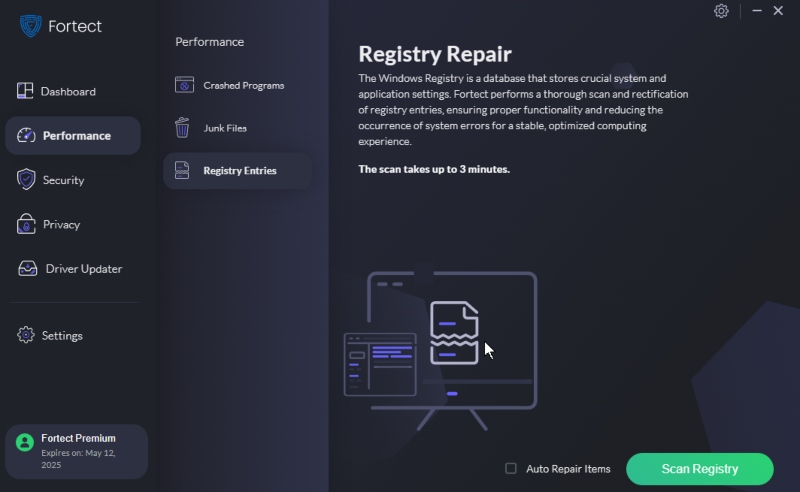
Fortect is an excellent program because it thoroughly scans, cleans, and repairs registry entries, ensuring proper function and relieving system errors—just right for method 6.
Download and Install Fortect now.
Method 6. Third-Party Registry Cleaners
Third-party registry cleaners can help identify and fix registry issues that built-in Windows tools might miss. These programs scan your registry for invalid entries, optimize its performance, and improve system stability. However, it’s essential to choose reputable software to avoid potential harm.
- Research and choose a reputable registry cleaner
- Download and install the registry cleaner software.
- Open the registry cleaner and follow the instructions to scan and fix registry issues.
- Restart your computer after the cleaning process is complete.
Method 7. Clean Up the Hard Drive
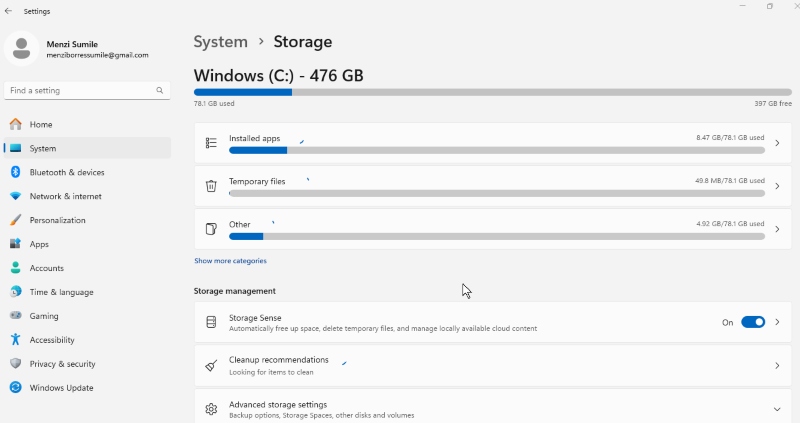
- Open the Start menu and type “Storage.”
- Select “Storage settings” from the search results.
- Click on your primary drive (usually the C: drive) to see a breakdown of storage usage.
- Delete unnecessary files and uninstall unused applications to free up space.
Method 8. System Restore
System Restore allows you to revert your computer to a previous state, undoing recent system changes that may have caused registry issues. This tool is handy for resolving problems that started after installing new software or updates and restoring your system to a stable configuration.
Follow the steps below:
- Open the Start menu and type “Create a restore point.”
- Select the “System Properties” window and click “System Restore.”
- Click “Next” and choose a restore point from the list.
- Follow the on-screen instructions to restore your system to the selected point.
Method 9. Reset Your PC or Reinstall Windows
Resetting your PC or reinstalling Windows can resolve deep-rooted registry issues and restore system stability. This process reinstates your operating system to a fresh state, eliminating persistent problems caused by corrupted registry entries.
Reset Your PC
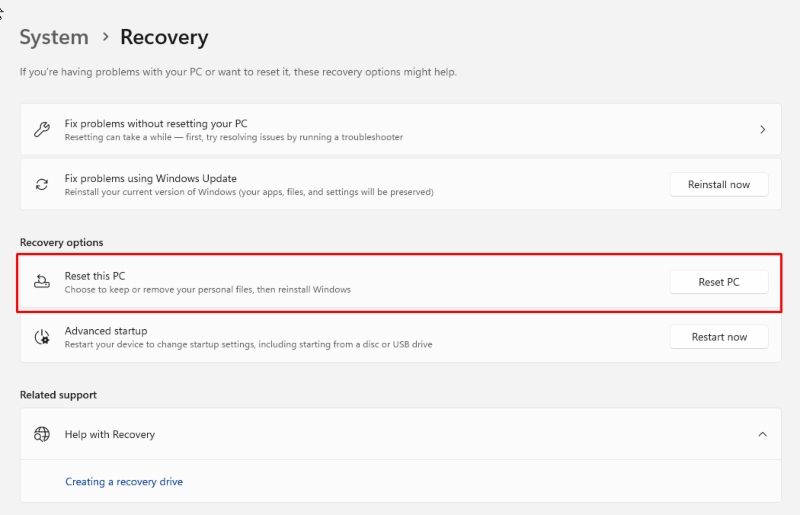
- Open the Start menu and click on “Settings.”
- Go to “Update & Security” and then “Recovery.”
- Under “Reset this PC,” click “Get started.”
- Choose whether to keep your files or remove everything.
- Follow the on-screen instructions to complete the reset process.
Reinstall Windows
- Backup all your important files to an external drive or cloud storage.
- Create a bootable USB drive with the Windows installation media.
- Restart your PC and boot from the USB drive.
- Follow the on-screen instructions to reinstall Windows.
- Reinstall your applications and restore your files from the backup.
Why You Should Backup Your Registry
Before making any changes to your registry, it’s crucial to back it up. This ensures you can restore the registry to its previous state if something goes wrong. Use the built-in Registry Editor to export your current registry settings.
- Press Win + R to open the Run dialog.
- Type regedit and press Enter to open the Registry Editor.
- In the Registry Editor, select “File” and then “Export.”
- Choose a location to save the backup file, name it, and click “Save.”
Conclusion
Maintaining a healthy Windows Registry is vital for your PC’s overall performance and stability. Understanding common causes of registry issues and applying the appropriate fixes can keep your system running smoothly. Remember to back up your registry before making any changes, and consider professional help for persistent problems.


