Managing Exceptions in Fortect Security Center: A Comprehensive Guide
Fortect for Windows is a robust antivirus solution designed to provide comprehensive protection against digital threats. One of the critical features of Fortect Security Center is the ability to manage exceptions. This allows users to specify trusted files, folders, and websites that should not be scanned or blocked. Managing exceptions ensures that essential software operates without interruption, thereby enhancing both security and performance.
Why Manage Exceptions?
Managing exceptions is crucial for several reasons:
- Prevent Unnecessary Scanning: By marking certain items as trusted, you can avoid unnecessary scans and reduce the number of false positives.
- Improve Performance: Excluding large files or frequently accessed folders from scans can significantly enhance system performance.
- Smooth Operation: Ensures that essential software and operations are not disrupted by security scans.
Setting Up and Managing Exceptions
Managing exceptions in Fortect Security Center is straightforward. Here’s how you can set it up:
Accessing the Exceptions List
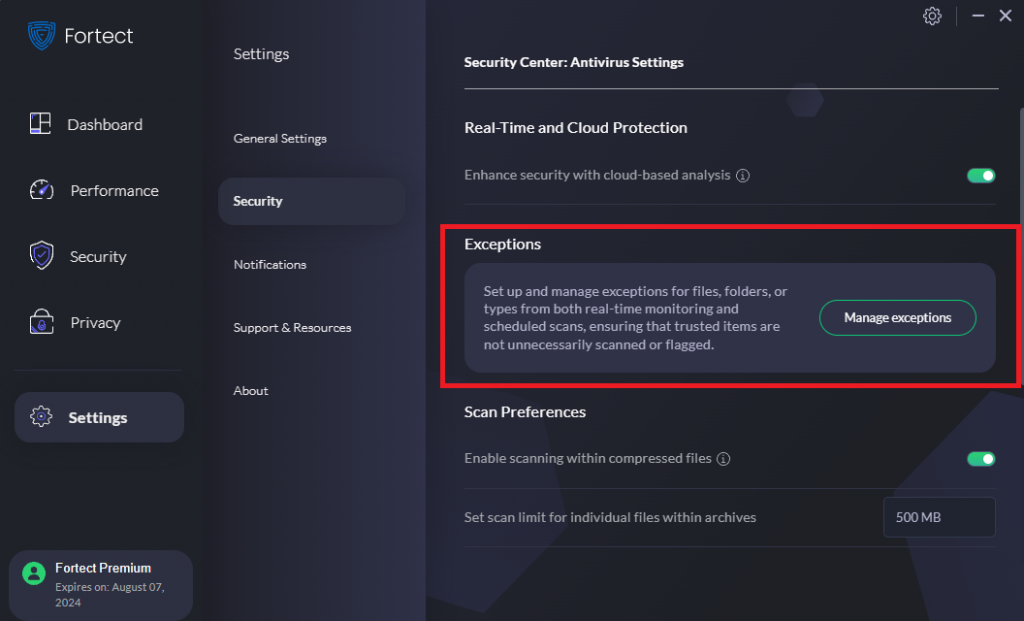
- Navigate to Settings:
- Open Fortect
- Go to
Settings.
- Access the Security Section:
- Within Settings, navigate to the
Securitytab.
- Within Settings, navigate to the
- Open Exceptions:
- Click on
Exceptionsto open the exceptions management menu.
- Click on
Adding an Exception
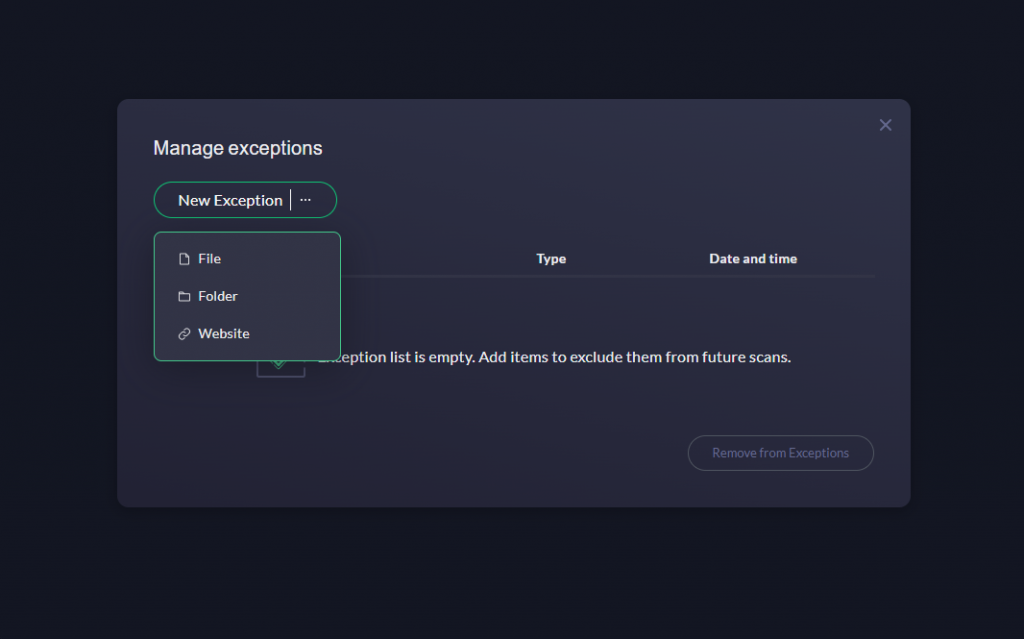
- Select New Exception:
- In the Exceptions menu, click on
the 3 dots
- In the Exceptions menu, click on
- Choose the Type of Exception:
- You will be prompted to choose whether you want to add a file, folder, or website as an exception.
- You will be prompted to choose whether you want to add a file, folder, or website as an exception.
- Browse and Select the Item:
- Browse to the desired file, folder, or enter the website URL.
- Select the item and click
Add.
Managing Existing Exceptions
- View the List of Exceptions:
- In the Exceptions menu, you will see a list of all the items you have added as exceptions.
- In the Exceptions menu, you will see a list of all the items you have added as exceptions.
- Edit or Remove Exceptions:
- To edit an exception, select it from the list and make the necessary changes.
- To remove an exception, select it and click
Removefrom Exceptions

Best Practices for Managing Exceptions
- Regularly Review Exceptions:
- Periodically review your list of exceptions to ensure that they are still necessary. Remove any items that no longer need to be excluded from scans.
- Periodically review your list of exceptions to ensure that they are still necessary. Remove any items that no longer need to be excluded from scans.
- Only Exclude Trusted Items:
- Be cautious about what you add to the exceptions list. Only exclude items that you are certain are safe and necessary for your operations.
Managing exceptions is a powerful feature in Fortect that allows users to optimize their security settings. By specifying trusted files, folders, and websites, users can ensure that essential software operates smoothly and performance is enhanced. Regularly reviewing and managing these exceptions helps maintain a balance between robust security and optimal system performance.
For more information or support, visit our website or contact our customer service team at [email protected].
Setting Up and Managing Whitelisting

Adding Exceptions
The primary function of whitelisting in Fortect is to allow you to set up and manage exceptions for files, folders, or specific types of both. This means that you can designate trusted items that should not be unnecessarily detected by Fortect Security Center.
Here’s how to add exceptions:
- Navigate to the Whitelist Section: From the Fortect Dashboard, go to Settings > Security, locate the option for managing your whitelist.
- Add Files, Folders or Website:
- To add a file, click on the “File” option and navigate to the file’s location on your system.
- To add a folder, select “Folder” and choose the directory you wish to whitelist.
- To add a website, select “Website” and choose the directory you wish to whitelist.

Managing Exceptions
Over time, your needs may change, and you might find it necessary to update your whitelist. Fortect makes it simple to remove items from your whitelist, maintaining its relevance and effectiveness. To remove an item, simply locate the file or folder you wish to remove from the list and select the option to delete it. This flexibility ensures that your whitelisting remains dynamic and aligned with your current security requirements.
