How to Fix Windows 11 Sleep Mode Not Working
Sleep mode in Windows 11 is essential for conserving battery and maintaining your device’s longevity. However, when sleep mode stops working, your PC may stay active, draining power and potentially slowing performance over time. We will cover practical ways to fix Windows 11 sleep mode issues to help you restore your computer’s normal functioning.
Common Causes of Sleep Mode Issues in Windows 11
Windows 11 sleep mode problems can stem from multiple factors interfering with the system’s ability to enter or stay in sleep mode. Here are some of the most common causes:
- Outdated Drivers: Old or incompatible device drivers, especially for display, power management, or network adapters, can prevent Windows from entering sleep mode correctly.
- Power Settings Misconfigurations: Incorrect sleep or power settings can cause the system to stay active or fail to wake up, disrupting sleep mode functionality.
- Background Applications: Certain applications or services running in the background, such as antivirus scans or network services, can prevent the system from entering sleep mode.
- Wake Timers and Scheduled Tasks: Active wake timers or scheduled tasks can interrupt sleep mode, often triggering the system to wake up unexpectedly.
- Firmware or BIOS Issues: Outdated BIOS or firmware on some devices can interfere with hardware compatibility, impacting power-saving features and causing sleep mode issues.
6 Ways to Fix Windows 11 Sleep Mode Not Working
Check Power and Sleep Settings
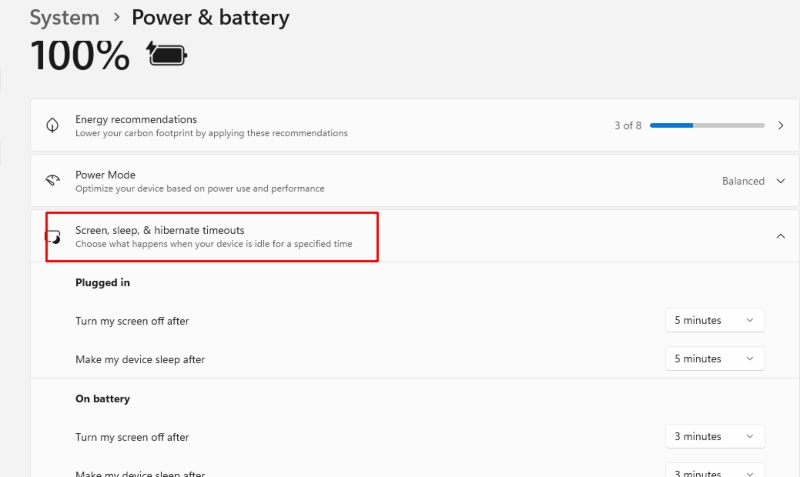
Power and sleep settings control when your device enters sleep mode based on how long it has been inactive. If these settings are misconfigured, your PC may not enter sleep mode as expected. Adjusting these settings can ensure that sleep mode activates at the correct time.

- Open Power Settings: Go to Settings > System > Power & Battery.
- Adjust Sleep Timers: Set timers for SSleepreen and sleep mode under Screen and Sleep.
- Check Advanced Power Settings: Open Control Panel > Hardware and Sound > Power Options > Change plan settings > Change advanced power settings to configure detailed sleep settings.
Update Windows and Device Drivers
Outdated drivers or system updates can interfere with how Windows 11 interacts with hardware components, including those controlling sleep mode. Ensuring all current drivers and Windows updates can resolve compatibility issues that prevent sleep mode from functioning.

- Run Windows Update: Go to Settings > Windows Update and click Check for updates.
- Update Device Drivers: Open Device Manager and update essential drivers, especially for display, network, and power.
- Use Driver Update Tools: If manual updates are challenging, consider using driver update software to automate the process.
You can invest in a third-party solution with an automatic driver updater like Fortect.
Fortect is a PC solution with real-time malware protection and a PC optimizer with driver updater features.
The fortect driver updater automatically scans all installed drivers, identifies which ones are corrupted or outdated, and updates them automatically from a secure location while optimizing your PC in minutes.

Download and install Fortect now.
Disable Wake Timers
Wake timers can interrupt sleep mode by waking up your PC at specific times. While this feature is helpful for scheduled tasks, it may cause sleep issues if it wakes your computer unexpectedly. Disabling wake timers can help maintain uninterrupted sleep mode.
- Adjust Wake Timers: Go to Control Panel > Power Options > Change plan settings > Change advanced power settings.
- Disable Allow Wake Timers: Under Sleep, Allow Wake Timers and set it to Disable.
- Disable Scheduled Maintenance Wake: To wake up your PC, go to Settings > System > Power & battery > Additional power settings > Change plan settings and turn off any maintenance settings.
Check for Background Applications
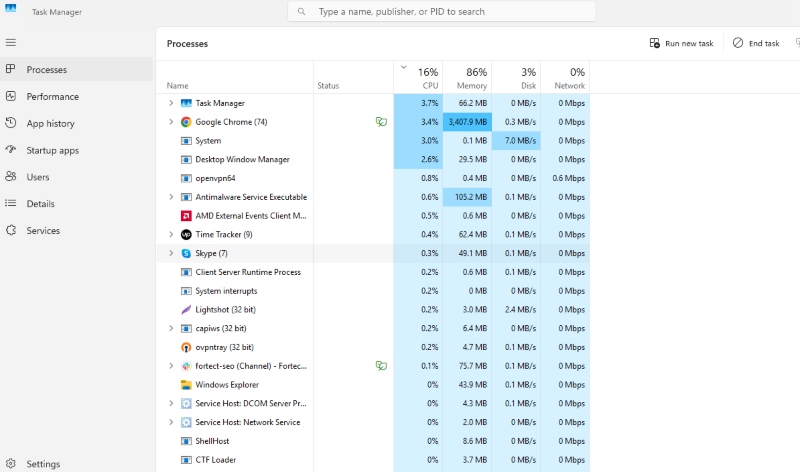
Specific background applications can prevent sleep mode by keeping your PC active. These apps may include programs set to run at startup, scheduled tasks, or active network connections. Checking and managing these applications can help resolve sleep mode interruptions.

- Open Task Manager: Press Ctrl + Shift + Esc and check the Startup tab for applications that launch on startup.
- Close Background Applications: Under the Processes tab, end tasks for any unnecessary running applications.
- Disable Active Apps from Running in the Background: Go to Settings > Apps > Installed apps, select an app, and turn off its permission to run in the background.
Run Windows Power Troubleshooter
Windows 11 includes a built-in troubleshooter for diagnosing and fixing power issues. Running this tool can help detect configuration errors or system issues that interfere with sleep mode.
- Access Power Troubleshooter: Go to Settings > System > Troubleshoot > Other troubleshooters.
- Run Power Troubleshooter: Click Run next to the Power troubleshooter and follow the prompts.
- Apply Suggested Fixes: Review any suggested fixes, apply them, and check if sleep mode works.
Check for BIOS and Firmware Updates
The Basic Input/Output System (BIOS) and firmware control your device’s hardware configuration. Outdated BIOS or firmware can cause sleep-related issues in Windows 11, especially on newer devices with advanced power-saving features. Updating these settings can improve hardware compatibility with sleep mode.
- Identify Your BIOS Version: Type System Information in the Windows search bar and check the BIOS version.
- VisitManufacturer’s Website: Download your device model’s latest BIOS or firmware update.
- Follow Installation Instructions: Carefully follow the manufacturer’s instructions for updating the BIOS, which can impact your system’s stability.
Conclusion
Fixing sleep mode issues in Windows 11 ensures your device remains energy-efficient and ready for use. By adjusting power settings, updating drivers, disabling wake timers, and using Windows troubleshooters, you can effectively resolve the most common problems. Each step brings you closer to a smoother, optimized experience so your Windows 11 computer can reliably enter and exit sleep mode as intended. Following these steps not only resolves immediate issues but also helps maintain the long-term health of your PC.


